It is often assumed that paint protection film DIY is a smart way to save money. The uncomfortable reality is that 78% of DIY PPF installations need to be redone within the first year because of trapped moisture, misalignment, or lifting edges, according to Rochester Car Care’s discussion of professional vs. DIY PPF.
That number surprises people because online videos make PPF look simple. Spray the panel, float the film, squeegee it out, done. Real installation work doesn’t happen in a vacuum. It happens around curved panels, sharp edges, dust in the air, changing temperatures, impatient hands, and film that punishes small mistakes.
That’s why an honest guide on Paint Protection Film DIY has to start with the risk, not the fantasy. If you’re new to detailing, ceramic coatings, or paint protection, this article will help you decide whether DIY PPF is a challenge you want to take on or one you’d rather hand off to a shop that does it every day. For readers searching for Columbus PPF, Hilliard paint protection film, or even Hilliard ceramic coating and Columbus ceramic coating options, this is the practical side of the conversation that usually gets skipped.
Table of Contents
- The Unspoken Truth About DIY Paint Protection Film
- Are You Truly Ready for a DIY PPF Project
- Gathering Your Professional-Grade Toolkit
- The Foundation Flawless Surface Preparation
- The Main Event A Wet Installation Walkthrough
- Finishing Touches Curing and Aftercare
- When to Hire a Pro in Columbus Ohio
The Unspoken Truth About DIY Paint Protection Film
DIY PPF isn’t hard in the same way a basic wash or wax is hard. It’s hard because the material is unforgiving. It has to land on paint that’s surgically clean, in an environment that stays controlled, with the installer managing moisture, alignment, tension, and edge adhesion all at once.
A beginner usually sees the middle of the process. The film is already cut. The panel is already prepped. The room is already clean. What’s missing from most tutorials is the part where small problems stack up. One speck of lint becomes a visible defect. One bad pull creates tension. One wet edge turns into lifting a day later.
Practical rule: If your goal is a result that disappears on the paint, PPF is not a forgiving first DIY project.
The hidden issue is that the job can look acceptable when you finish and still fail later. Moisture trapped in the wrong place, edges that never bonded, or film stretched too aggressively can turn a decent-looking install into a redo.
Here’s the mindset I’d recommend before buying any kit:
- Don’t judge difficulty by YouTube speed. Edited installs remove the slowest, most frustrating parts.
- Assume your first panel will teach expensive lessons. Flat sections are more manageable than bumpers, mirrors, and door cups.
- Treat perfection as the standard. PPF isn’t like dressing tires or applying a spray sealant. Defects stay in front of your face every time the light hits the panel.
- Respect the environment. Dust, wind, direct sun, and unstable temperatures all work against the adhesive and the finish.
People searching for paint protection film DIY often expect a technique article. The better question is whether you want to spend your time learning a trade skill on your own vehicle. For some enthusiasts, that answer is yes. For most owners, especially anyone protecting a newer car, the better answer is to understand the process well enough to know when not to gamble.
Are You Truly Ready for a DIY PPF Project
DIY PPF has a high failure rate for first-timers, and the expensive part is not always the kit. It is the wasted film, the hours spent chasing contamination, and the moment you realize a bad edge or trapped line will stare back at you every time the car is clean.
Cost is not just the kit price
DIY kits can look inexpensive at checkout. The actual number climbs fast once you add prep chemicals, quality towels, slip and tack solutions, blades, squeegees, and extra material for the panel you will almost certainly want to redo.
That is the part beginners miss. They compare a kit price to a professional invoice and assume the gap is labor markup. In a shop, that price also covers pattern experience, cleaner installs, proper lighting, controlled temperatures, and a technician who knows how to recover a panel before it turns into scrap. If you are still weighing the trade-offs, this breakdown of PPF pros and cons gives useful context before you commit.
There is also a risk cost. A cheap first attempt on an older daily driver is one thing. Learning on a new truck, a black car, or anything you care about cosmetically is a different decision.
Your workspace decides a lot
I tell customers this all the time. The garage matters almost as much as your hands.
PPF needs a clean indoor space, steady temperatures, good light, and enough room to move around the panel without brushing against dusty shelves, cords, or dirty walls. A driveway install can work for a small test piece, but wind, pollen, bugs, and shifting surface temps make full panels much harder than they look online.
Time matters just as much. Good prep is slow. Laying film is slower. Then the vehicle needs cure time without getting rushed back into daily use.
Analysts at Grand View Research’s U.S. paint protection film market report note that professionally applied PPF is expected to last five to 10 years. DIY work often falls short when prep, bonding, or edge finishing is off. That is a hard lesson because the install can look decent on day one and still start lifting later.
A clean panel is only half the job. A clean space and enough time to work carefully are what separate a usable result from a redo.
If you are comparing PPF with easier paint protection options, PPF asks for far more discipline. It delivers strong impact protection when installed well, but it is not beginner-friendly in the way waxes, sealants, or even many ceramic products are.
Use this gut-check before ordering anything:
| Question | If the answer is no |
|---|---|
| Do you have a clean indoor space? | Delay the project |
| Do you have several uninterrupted hours per panel? | Expect rushed decisions and more defects |
| Are you comfortable wasting material while learning? | Budget for extra film or hire a pro |
| Is the vehicle new, dark-colored, or sentimental? | Do not use it as your practice car |
Gathering Your Professional-Grade Toolkit
Tool choice decides whether DIY PPF feels difficult or flat-out punishing. I've seen plenty of first attempts fail before the film even touches the paint because the installer tried to save money on bottles, towels, blades, and heat control.
What belongs in a real PPF install kit
PPF needs a purpose-built setup. Household substitutes create drag, lint, contamination, weak slip, poor tack, and rough edges. That is why the material cost is only part of the bill. The supporting gear adds up fast, which is one reason professional installation starts to make more financial sense once you price out a full DIY attempt.
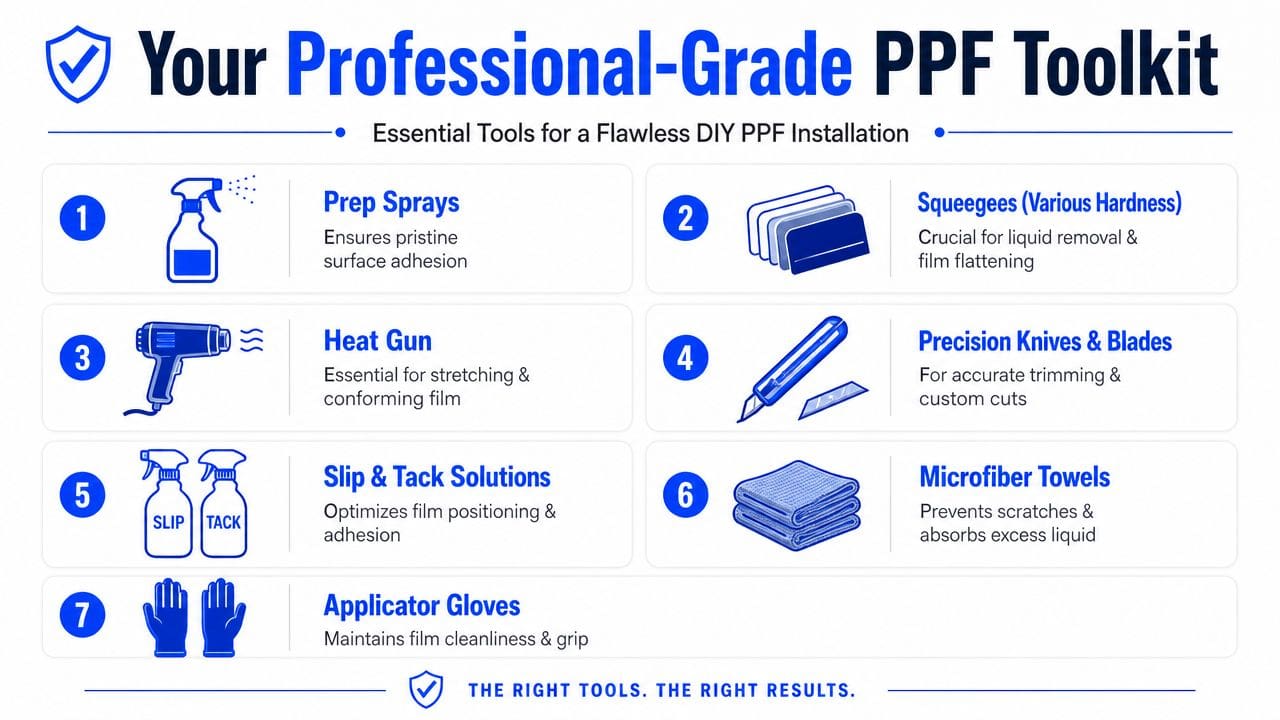
Here's the starter kit I'd want a beginner to have before opening a box of film:
- Quality film: Pre-cut kits reduce the chance of cutting on the car, but cheap film still creates problems. Lower-grade material can distort more easily, stretch unpredictably, and fight you on edge wrap. If you're comparing materials, this breakdown of best PPF brand options is a useful place to start.
- Slip and tack bottles: Use separate, clearly labeled bottles. Slip gives you working time to position the film. Tack helps lock down edges, corners, and anchor points.
- Squeegees in different firmness levels: One blade is not enough. Softer squeegees help on curves and sensitive areas. Firmer ones move solution out faster on flatter sections.
- Clay bar and prep spray: Anything left on the paint will show through the film or interfere with bonding.
- Isopropyl alcohol for a final wipe-down: A properly diluted alcohol wipe removes leftover oils, residue, and fingerprints before installation. That step matters because adhesive does not bond well over waxes, polishing oils, or dressing sling.
- Heat gun: Controlled heat helps with conforming film around curves and setting edges. A weak consumer dryer usually does not give steady enough heat.
- Sharp blades and precision knives: Fresh blades cut cleanly. Dull ones drag, snag, and increase the chance of tearing film or scarring an edge.
- Microfiber towels: Use clean, lint-minimizing towels only. Old shop rags and bargain towels cause more contamination than beginners expect.
- Applicator gloves: Gloves help keep fingerprints, skin oils, and lint off the adhesive side while you handle larger pieces.
The hidden expense is duplication. You do not buy one towel, one blade, or one bottle and call it done. You need backups because once a towel drops, a blade dulls, or a bottle gets contaminated, it should be replaced on the spot.
What cheap substitutions usually cause
Budget shortcuts show up in the finished job. A poor spray pattern can make the film grab too soon. A dirty towel can leave lint that gets trapped forever. Bad heat control leads to fingers, lift lines, or overstretched edges that fail later.
Common substitutions and their likely consequence:
| Substitute | Usual result |
|---|---|
| Old bath towel | Lint and drag marks |
| Generic glass squeegee | Poor water evacuation and lines |
| Dirty spray bottle | Contaminated solution |
| Weak hair dryer | Inconsistent shaping |
| Dull blade | Torn edges or rough trimming |
Good tools do not make PPF beginner-friendly. They remove a few avoidable mistakes. The harder truth is that even with the right kit, installation still has a steep learning curve. For many car owners, paying a pro is the cheaper option once you factor in wasted film, tool purchases, and the cost of redoing a bad result.
The Foundation Flawless Surface Preparation
Most failed installs don't begin when the film touches the paint. They begin during prep. If the panel isn't completely clean, the film locks your mistakes in place.
The prep process that actually works
A reliable prep routine has several layers. Skipping one might save time now, but it often creates visible issues later.
Use this order:
-
Thorough wash
Start with a careful wash that removes loose dirt without grinding contamination into the paint. Use clean wash media and dry the vehicle fully. -
Chemical decontamination
If the paint has embedded fallout, use an iron remover or similar decon product before touching the paint with clay. This reduces what the clay has to shear off mechanically. -
Mechanical decontamination with clay
Clay removes bonded contaminants that washing leaves behind. The panel should feel smooth afterward, not gritty. -
Final alcohol wipe
Remove remaining oils, residue, and any product left from previous detailing work. PPF adhesive doesn't want waxes, dressings, or polishing oils between it and the paint. -
Final inspection under strong lighting
Look from multiple angles. Touch the paint lightly with a clean glove. If you feel contamination, the film will show it.
A beginner mistake is assuming “looks clean” means “is ready.” It doesn't. PPF magnifies what a wash alone misses.
What contamination looks like under film
Dust under film isn't subtle. It can show up as small raised points, bubbles that won't lay flat, or texture that catches light every time you walk past the car. On dark paint, that's especially noticeable.
Here are the defects prep is meant to prevent:
- Tiny lint nibs: Usually from towels, air movement, or dirty clothing.
- Adhesion problems at edges: Often caused by leftover oils or solution contamination.
- Visible trapped particles: Dirt, grit, and dried residue become permanent visual distractions.
- Silvering or poor clarity: Surface contamination can interfere with how clean and uniform the film looks.
If you wouldn't want to clear coat over the surface as-is, don't lay PPF over it either.
This is also where environment and prep merge. Even a perfectly washed panel can pick up debris from a dusty garage in minutes. Sweep the floor beforehand. Control airflow. Keep your towels clean and your hands cleaner.
For new owners in Columbus PPF and Hilliard paint protection film searches, this is often the first surprise. The install doesn't start with the film. It starts with decontamination and discipline.
The Main Event A Wet Installation Walkthrough
Wet install is the part DIY guides tend to romanticize. In the shop, this is also the step where beginners crease a $200 kit, contaminate the adhesive, or stretch a clean pattern out of shape in under five minutes.
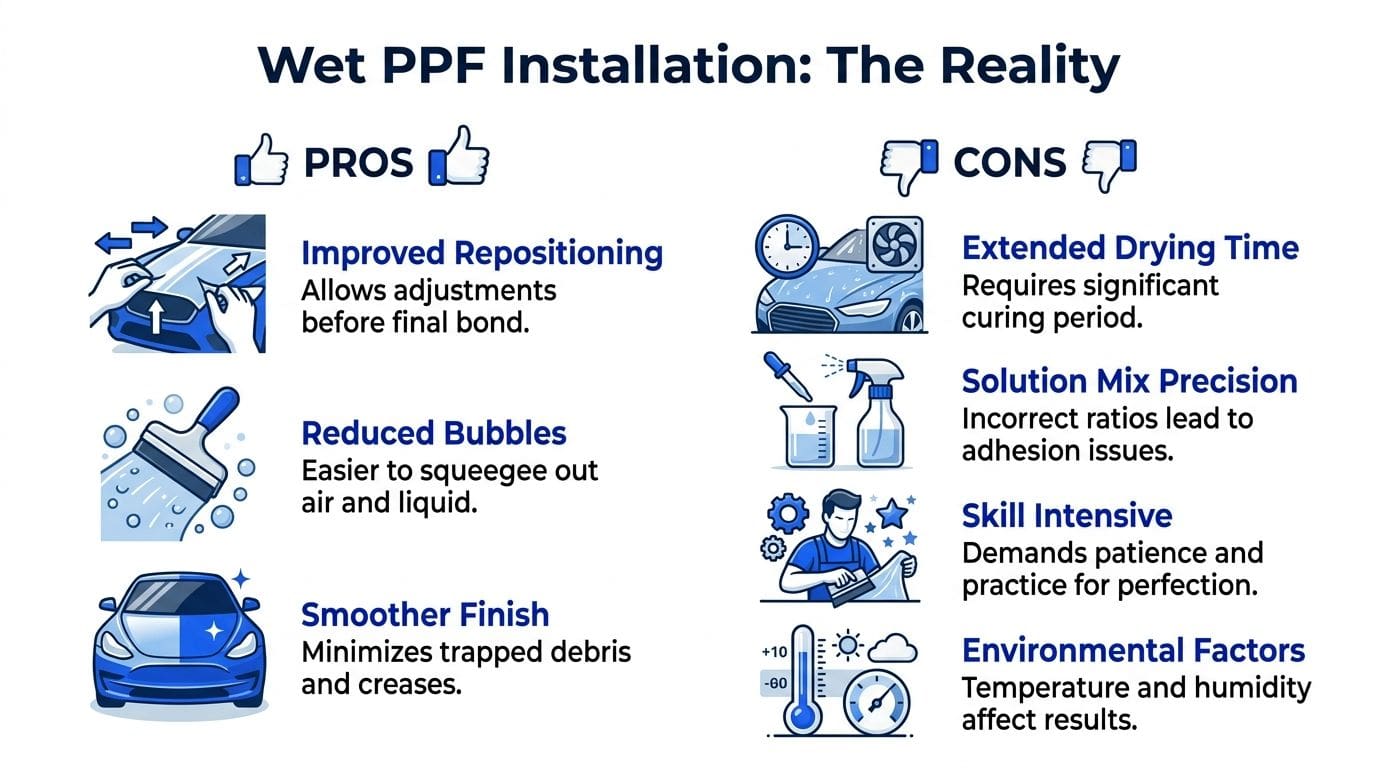
A wet install gives you repositioning time. It does not give you much margin for sloppy hands, bad alignment, or hesitation. Once the film starts grabbing in the wrong place, the job gets harder fast. Pull it up too many times and you increase the odds of lint, stretch marks, and edge failure.
Mixing and laying the film
Your slip solution has to be consistent. According to Decowell Film's step-by-step PPF application guide, a workable mix is 1.5 to 2 ml of baby shampoo per 32 ounces of distilled water, with a small dry anchor area used to lock the piece before full squeegee work begins. The same guide also recommends firm overlapping strokes at a 30 to 45 degree angle, gentle forming heat in the 110 to 140°F range, tighter forming heat in the 150 to 180°F range, and restraint on both dwell time and stretch.
Those numbers matter because the film needs two opposite things at once. It has to float long enough for alignment, then bite hard enough to stay where you put it.
A practical install sequence looks like this:
- Spray the panel evenly.
- Spray the adhesive side of the film.
- Set the piece down without dragging it across the paint.
- Align the major body lines and edges before you commit to pressure.
- Create a small anchor point so the pattern stops drifting.
- Work one controlled area at a time.
That anchor point is a professional habit that saves a lot of frustration. Without it, the whole piece can walk across the panel while you chase one corner.
How to squeegee without making a bigger mess
Squeegee technique decides whether the job settles down or starts fighting you. New installers usually make one of two mistakes. They use timid pressure and leave solution behind, or they press hard in random directions and trap fingers where they do not want them.
A separate installation reference from Charlotte Window Tinting's PPF technique article recommends working from the center outward with about 50 to 70% overlap on each pass. That is a solid habit for beginners because it gives moisture a clear exit path instead of shuffling it around under the film.
Use this approach while you work:
- Start from a stable center section: Build outward once that area is seated.
- Overlap every stroke: Untouched lanes turn into trapped moisture lines.
- Keep the blade angle low: A shallow angle evacuates solution better than an upright one.
- Watch the water line: If it keeps reappearing, your angle, pressure, or both need to change.
- Stop and reset early: A small finger is easier to fix before tension spreads across the panel.
A panel can look smooth and still be full of water. Judge the install by what leaves the film, not by the first glance.
This is also where DIY costs creep up. One bad pass can send dirt into the adhesive, force a full lift, and turn a usable piece into scrap. Professionals avoid a lot of that waste because the hand skills are already there.
Using heat without distorting the pattern
Heat helps on curves, recessed areas, and wrapped edges. Heat also ruins film in inexperienced hands. Too little and the material fights you. Too much and you create tension that shows up later as lifted corners, shrinking edges, or fingers that keep returning.
For bumper corners, mirror caps, and other curved sections:
- Warm the area gradually instead of blasting one spot.
- Spread tension across the piece.
- Let the film relax before pulling again.
- Reset if bunching starts.
- Stay disciplined on stretch.
The hard truth is that flat panels teach placement. Bumpers expose every weakness in your technique. If you want to learn, start with a small, flatter area and accept that the first attempt may not be pretty. If you want the front end of your car to look right the first time, paying for professional installation is usually cheaper than wasting film, tools, and a full weekend trying to rescue a bad install.
Finishing Touches Curing and Aftercare
A DIY PPF job can look good for an hour and fail by the next morning. Corners lift, trapped moisture turns cloudy, and one rushed trim line can put a blade mark in the paint. That is the part a lot of beginner guides gloss over.
Trimming and edge work
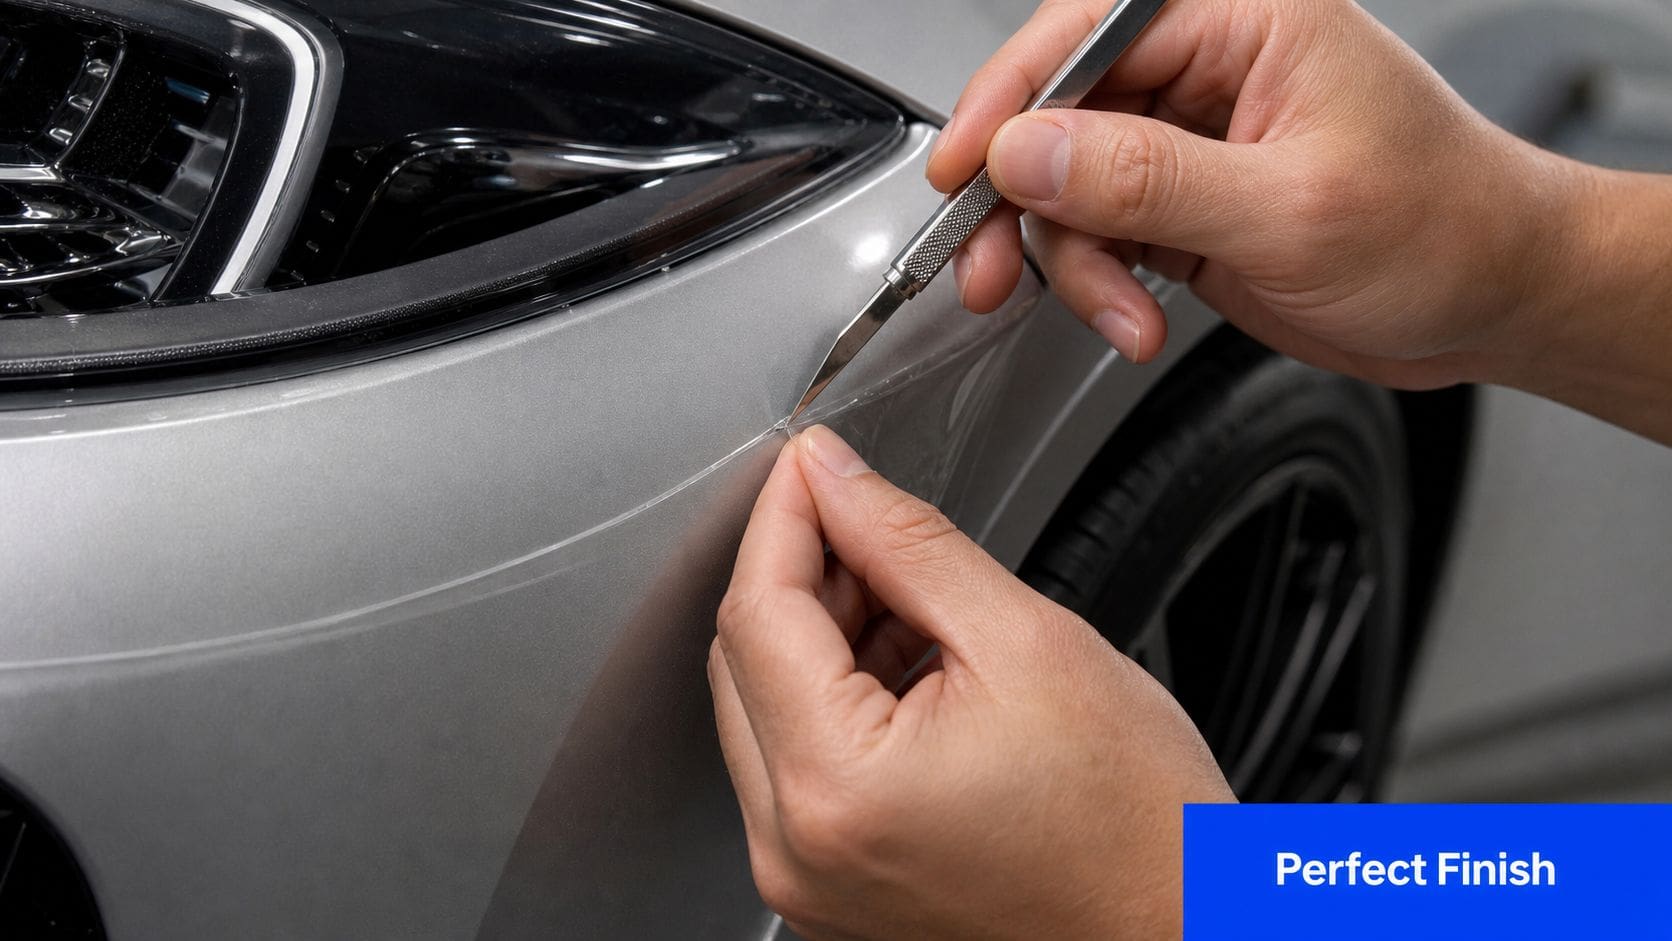
Final trimming is where many DIY installs stop being a money-saving project and start becoming a repair risk. A sharp blade will cut film cleanly. It will also cut clear coat just as cleanly if your hand position is off.
Calgary Paint Protection Film's beginner guide makes two points beginners should take seriously. Light scoring is safer than forcing a deep cut, and fresh installs need real cure time before water exposure or washing. Both are standard shop practice for a reason.
For edge finishing, slow down and get deliberate:
- Use the least blade pressure possible: A fresh blade should glide, not dig.
- Set your body before the cut: Bad stance creates uneven seams and wandering lines.
- Tuck or wrap edges where the panel allows it: Exposed edges collect dirt and are easier to lift.
- Switch from slip to tack solution at the right time: Wet edges do not lock down well.
- Stop chasing large bubbles with endless squeegee passes: If one remains after proper installation, a fine needle is safer than overworking the area.
This is one of the clearest trade-offs in DIY PPF. Pre-cut kits reduce the chance of paint damage, but they leave less room for error on alignment. Bulk film gives more flexibility, but trimming near visible paint takes a very steady hand. If that part makes you uneasy, a professional PPF installer in Columbus, Ohio is usually the cheaper option once you factor in the cost of redoing a bad panel.
Cure time and the first wash
Fresh film needs quiet time. Leave it alone, keep it dry, and resist the urge to press on corners or check every edge with your fingertips.
Med City Detail's installation article recommends letting the film cure indoors for at least 24 hours away from rain or heavy moisture, then avoiding washing for at least 7 days. In real shop conditions, longer is often better if the weather is cool or humid.
After the cure window, treat the film like a finish that is still settling in:
- Wash with pH-neutral soap: Harsh cleaners dry out edges and can dull the top coat.
- Keep distance with a pressure washer: This PPF maintenance discussion warns against using a tight spray pattern or getting too close to seams.
- Avoid blasting edges directly: Water forced under an edge can start a lift that keeps spreading.
- Use light polishing only when appropriate: Minor surface marring can sometimes be cleaned up, but aggressive correction is a bad idea on a fresh install.
Aftercare is where the hidden cost of DIY shows up. A pro install usually comes with controlled curing conditions, cleaner edge work, and someone to fix a problem before it turns into a full replacement. On a home install, if an edge fails after two days, that redo is on you.
When to Hire a Pro in Columbus Ohio
Some DIY projects are worth trying once. PPF depends on what's at stake. If the car is new, dark-colored, expensive to repaint, or you want coverage on complex shapes, the smart move is often to skip the experiment.
The jobs that shouldn't be your first attempt
I'd strongly caution against making these your entry point:
- Full front-end coverage on a new vehicle
- Bumpers with deep curves and vents
- Mirror caps and tight recesses
- Anything requiring custom trimming near visible paint edges
The risk isn't just a bad-looking install. There's also the removal side. A major problem with botched DIY jobs is the part nobody talks about enough. The “hidden cost of removal” is real. As explained in this video discussion of DIY PPF removal risk, pulling against the film's tension incorrectly can strip factory paint.
That's the kind of mistake that erases any money you thought you saved.
Why professional installation is usually the better value
For drivers in Hilliard, Dublin, and the greater Columbus area, professional Columbus PPF service is usually a value decision, not a luxury decision. You're paying to avoid visible contamination, tension mistakes, trimming damage, edge failure, and painful removal later.
If you're comparing shops, look for installers who provide work with an unnoticeable finish, understand panel-specific tension, and can explain coverage options clearly. For readers looking for a trusted local option, this page on the best PPF installer in Columbus, Ohio is a good place to start.
A lot of people who search for Hilliard ceramic coating, Columbus ceramic coating, or ceramic coating near me eventually realize they want two things. They want protection, and they want peace of mind. PPF done right gives you both. PPF done badly gives you a project you regret.
If this guide helped you see the trade-offs in paint protection film DIY, and you'd rather have the job done cleanly the first time, Lionheart Detailing can help. We provide professional paint protection film, ceramic coating, and full detailing services for drivers in Hilliard and across the Columbus area, with honest advice on what your vehicle needs.